Shoe Storage Hacks For Your Next RV Camping Adventure
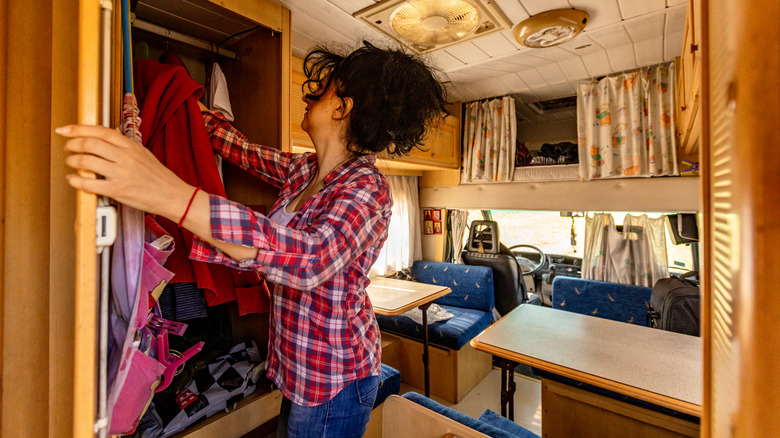
When you're out there living the RV life, every square inch of space matters. And while you probably spent a big chunk of time researching different ways to keep your fridge organized, how to maximize your closet space for clothes and camping gear, and even tips for packing for a road trip with your dog, there's one more item that often gets overlooked until it becomes a daily frustration: your shoes. Whether you're tracking in mud from a morning hike or kicking off your sandals after a day well-spent at the beach, shoes have a habit of creating clutter and chaos in tight RV spaces.
This issue becomes even more of a headache when you realize just how quickly shoes can take over your RV floor. Between a couple pairs of hiking boots, water shoes, flip-flops, and everyday sneakers, most travelers can easily accumulate eight or more pairs during a single trip. And, without a proper storage system, it's pretty much guaranteed that most of them will end up scattered across the floor, sliding around while you drive, and creating potential trip hazards in your already-narrow walkways.
Thankfully, clever RVers have developed plenty of creative solutions to tackle the shoe storage dilemma that happens in plenty of motorhomes. From simple DIY projects that'll cost less than $20 to space-saving products you can buy and install in minutes, these hacks will help keep your footwear organized, easily accessible, and off your RV floor and out of your way.
Use a cargo net
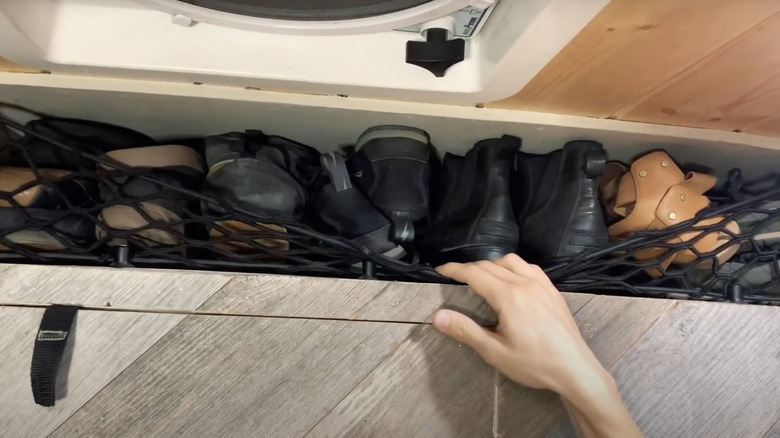
One of the most practical shoe storage hacks comes from making the most of any unused overhead spaces by installing cargo nets. By repurposing bicycle cargo nets — available on Amazon for about $10 each — you can create a custom shoe hammock that'll keep your footwear off the floor and easily accessible.
To put together the perfect RV shoe hammock, simply join two nets together with zip ties to create a larger storage area (roughly 15x30 inches). From there, you can secure it beneath any overhead cabinets or above shelving using cup hooks. The net should hold most types of shoes pretty well, so there's no need to worry about your footwear randomly falling out during travel.
All in all, the beauty of this solution lies in how both versatile and secure it is. To make it even more stable, you can try adding a small bungee cord and attaching it to an additional top hook to provide some extra tension, ensuring that all of your shoes will stay put, even during the bumpiest travel days. Ultimately, this simple modification will transform your previously wasted space into functional storage that can keep multiple pairs of shoes within arm's reach. Best of all, the entire project will likely take less than an hour to complete (and costs under $20), which makes it an ideal upgrade for any RV owner.
Hang them up with Command hooks
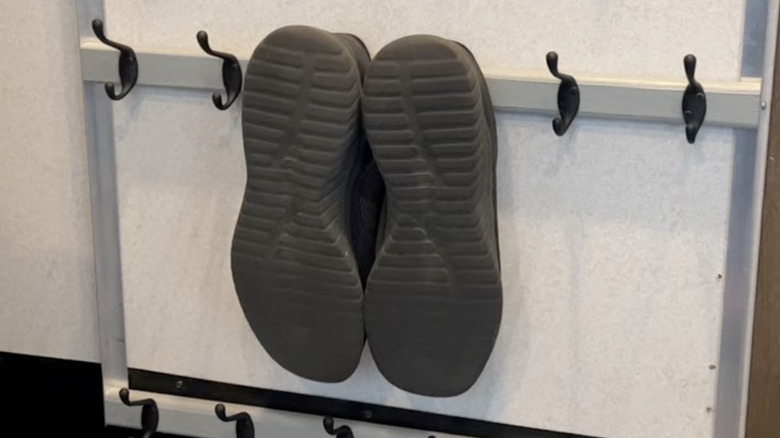
For RVers who prefer wall-mounted solutions, adhesive Command hooks ($12.99 on Amazon) also offer a quick and damage-free way to create vertical shoe storage. Perfect for RV travelers who want instant organization without any drilling or permanent modifications, this method works especially well for lightweight footwear like sandals and running shoes.
Better yet, installing the hooks couldn't be easier. Simply wipe the surface clean, apply the hooks according to the instructions, and — voilà! You can start hanging up your shoes pretty much straight away. Alternatively, if you're okay with a more permanent solution, using generic screw-in hooks and attaching them to your RV cabinets or door frames also works.
That said, although Command hooks might sound like the ultimate solution, keep in mind that this method likely won't hold your shoes once you start driving — you'll need to actually put them away elsewhere to make sure they don't go flying around when you hit that first bump. That said, it's mostly just a convenient way to keep any frequently-worn pairs near the RV entrance or bedroom areas so that you can easily grab them as you come in and out of your vehicle.
Tidy up using hanging organizers
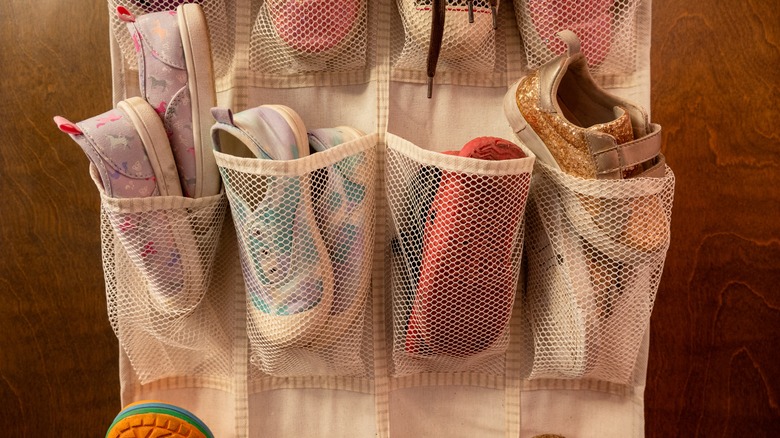
Another great hack courtesy of the RV community is using closet shoe organizers — especially in RVs with a good chunk of wardrobe space. The best part is that these organizers can be easily modified and customized to fit pretty much any space: simply cut the fabric down to your specific closet dimensions and hang it up.
Available on Amazon in a multi-pocket design (around $13) or a shelf-style version ($14), these organizers can be easily attached directly to existing closet rods. Just grab a pair of zip ties, adjust the hanging height as needed, and you're all set. Along with that, you can even use extra hooks, bungee cords, or ties to secure the bottom of the organizer to prevent it from swinging around too much while driving. Alternatively, you can split up the rows and attach them to any free space under your bed or cabinets (as pictured above).
Beyond shoes, the compartments can also work well for storing any miscellaneous bathroom supplies, socks, or other small items that you can't seem to find a permanent place for. Plus, the soft sides allow for some flexibility in what you store, and the lightweight material won't add any significant weight to your RV's cargo capacity — which is incredibly important since overloading your RV can lead to serious accidents.
Make a DIY PVC shoe rack
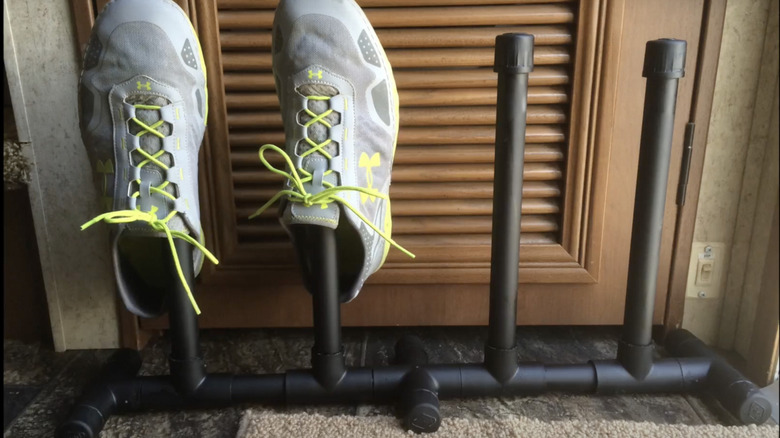
Lastly, for the hands-on RVer, there's one more creative solution that can help maximize your storage space and keep your shoes organized: building a custom PVC pipe shoe rack. The ultimate option in terms of flexibility, design, and sizing, creating your own shoe rack basically means you can decide exactly how many shoes it holds, where it fits, and how it looks to match your RV's interior style.
To put it together, you'll need four vertical pipes (about 12 inches tall), plus horizontal pipes to connect them at the base. From there, simply cut your PVC pipes to size, connect the vertical pieces using T-shaped fittings at the bottom, and cap them at the top. Then, you can add horizontal pipes between the T-fittings to create an even more stable base, with one four-way connector in the middle for extra support. Once everything fits together nicely, glue it all in place with PVC cement. As a bonus, paint the rack with indoor/outdoor paint in a well-ventilated area. And, if you prefer a more natural aesthetic, you can even create a similar design using wooden dowels and basic carpentry joints.
Although this option does require a little more time and some basic DIY skills compared to other solutions, it's a completely customized storage system that can perfectly match your RV's unique layout and your specific shoe collection needs. Plus, you can build the shoe rack to easily slide under your bed, fit perfectly in storage compartments, or simply stand against any free walls, depending on what you prefer.
Common mistakes to avoid
While all of these storage solutions can work wonders for your RV shoe organization, there are a few pitfalls you'll want to steer clear of. First, never store wet or muddy shoes in enclosed spaces or fabric organizers — doing this can quickly lead to mold, mildew, and unpleasant odors spreading throughout your RV. Instead, make sure you always let your shoes dry completely before tucking them away, or keep them in well-ventilated areas if you need to start driving before they've had a chance to dry.
Another crucial mistake to avoid is overloading any of your overhead storage with too many pairs of shoes. Remember that weight distribution matters in an RV, and putting too much weight up high can affect your vehicle's stability while driving, leading to things like poor handling, decreased fuel efficiency, and increased wear on your tires. As such, you'll want to stick to lightweight shoes in overhead nets (think flip flops and sneakers), and always keep your heavier boots in lower storage areas.
Finally, avoid using any storage solutions that block emergency exits or that create obstacles in narrow walkways. Ideally, your shoe storage should enhance your RV experience and not create any safety hazards. Similarly, you'll also want to make sure that any hanging organizers or racks are secured properly and won't swing into pathways when you're on the move.